Total Pageviews

Monday 14 November 2022

29 Let's go! Turn 5 (map 2)

 The story so far....

B Company had made several efforts to capture La Cambe, but were repulsed each time with heavy casualties among the attacking infantry and supporting armoured units.  Given the company's failure to take the hamlet, they were pulled out of the line and replaced with A Company who were ordered up to the front.  1st Platoon made a cautious approach to La Cambe, but found it deserted except for what looked like battle plans and some black painted broomsticks made to look like gun barrels.  With American forces approaching La Cambe from the flank and front and with the hamlet zeroed in for US mortar and artillery fire, the Germans have clearly pulled out deciding they have held up the US advance for too long. Captain Ford of A company sets up his Company Command post in La Cambe and orders 2 Platoon forward to assault the village 


                                       A Company, 175th Infantry, prepares to get into the war

It's been a while since our last game - I now have a new baby, so time for wargaming along with pretty much anything else is very limited!  But I managed to squeeze in a game at the weekend with Sigur.  Sigur decided to withdraw his platoon from Map 1 so this game was to be the Delaying Action at Arthenay on Map 2....probably a good thing as I don't think either of us could face playing map 1 again! The game from.the German perspective can be found here: https://www.tabletopstories.net/language/en/2022/11/29-lets-go-game-5/


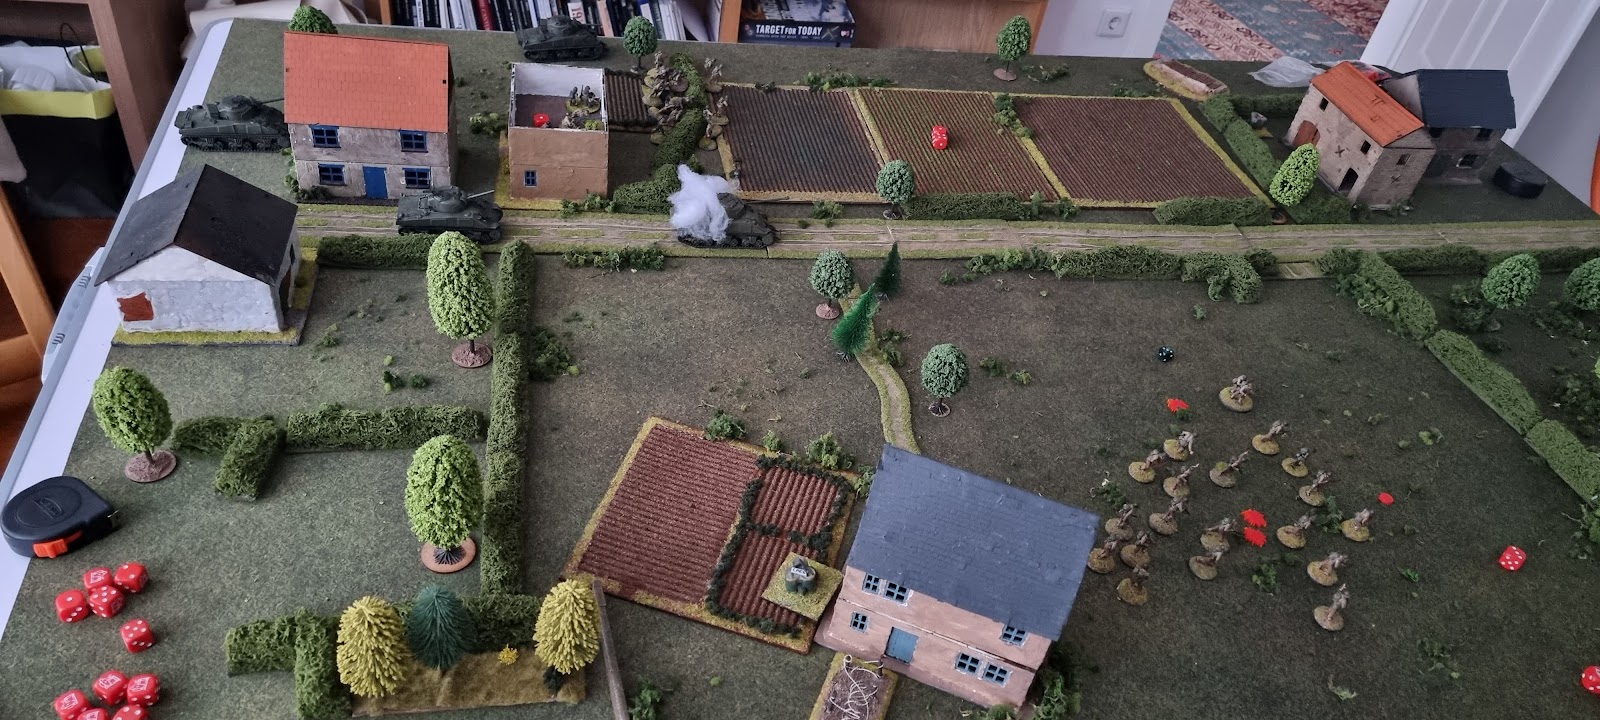
I set up a reasonable representation of the map from the 29 Let's Go PSC.   As with the rest of the US platoon's in the PSC, I don't really need to keep track of the personalities as I get a fresh platoon each turn.  However, I think it adds to the narrative and I like doing it.  So, here is 2nd Platoon:


The Platoon is led by 2LT Jared Acland a 24 Year Old Farmer's son from South Dakota.  He is supported by Platoon Sergeant SSGT Lew Olsen, a 27 year old warehouse clerk from California.  The three squads of 2 Platoon are lead by SGT Eric Wishinski (first squad), a farmer from Idaho, SGT Rick Carney (2nd Squad), a Bank Teller from Maine and SGT Dan "Chief" Waupoose (3rd Squad), the company's only Native American, formerly a hunter from Oklahoma.  For support, I took 3 Shermans and an Adjudant.

As before, they face the original platoon of Germans under command of Unterfeldwebel Zausel.  The German platoon has a number of patched up wounded, but no losses so far.  


The Game

For this game the Germans ended up with a force morale of 9, The US Force Morale was 11 - clearly 2 Platoon were very glad they didn't have to storm La Cambe!

The Patrol phase was fairly standard although the position of several patrol markers made for difficult decisions in placing the jump off points.  The US ended up with one on the edge of the orchard on the left flank, one behind the hedge on the right flank and one on the table edge on the right flank.  The Germans ended up with a JOP in the garden, one in a house and 1 just behind the wall by the barn (note: one hte map the walls are high - we didn't have any low walls so just used the high ones and said they were low!).  The German JOP in red is the objective for the US - they need to take and hold this JOP for the end of the turn.


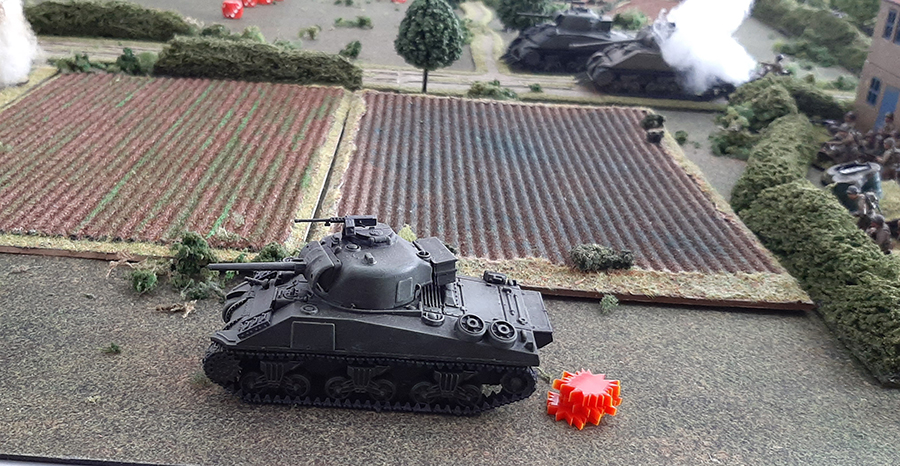
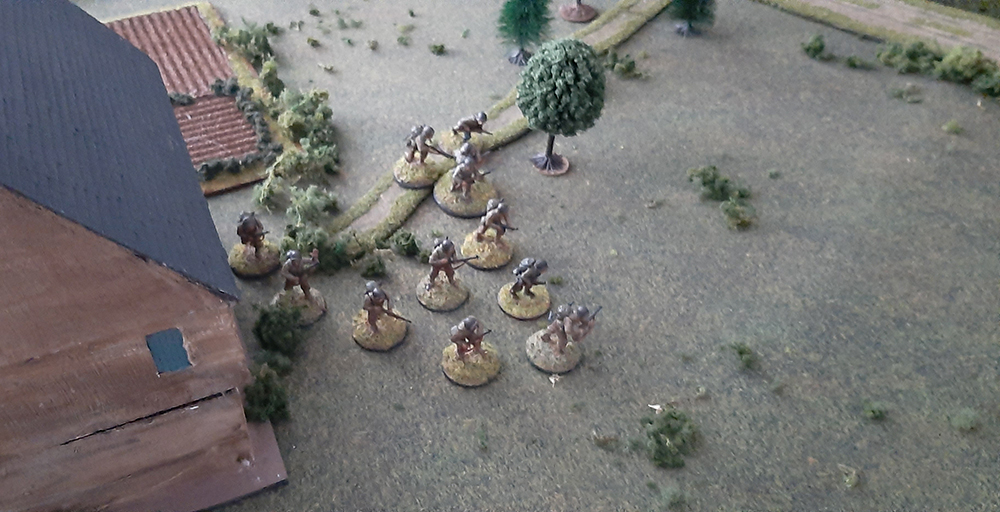
The US forces began their advance.  1st Squad deployed by the hedge in the orchard, and went on overwatch along with 2LT Acland, while a Sherman rumbled up the road.  With no sign of the Germans the rest of the US force rapidly deployed - the rest of the Sherman platoon on the road and 2nd and 3rd squad on the right flank. SSGT Olsen accompanied 2nd Squad.  Despite their swift deployment, once ordered forward the US infantry slowly picked their way towards the village. The lead tank went onto overwatch, as the other two Shermans advanced in support of the infantry.    

"SGT Forrest - advance your tank forward on my flank!" 2LT Peterson in the command Sherman ordered.  "You first!" muttered SGT Forrest deliberately moving his tank slowly.  Forrest had seen the burnt out wrecks of the 3rd company of the 747th Armored regiment and had no intention of ending up like them. 


SGT Forrest was wise - there was a faint boom and suddenly 2LT Peterson's Sherman was knocked out by fire from an off-table Marder.  The lieutenant and 2 crew were killed, the other two rolled out of the burning wreck and headed back towards La Cambe. That was an unpleasant surprise! 


The tank being knocked out gave the US infantry the impetus to move forward, covered by the remaining two Shermans and first squad on the left.  The lead Sherman reversed to move out of LOS from the Marder.

Sigur now rolled a double phase and deployed infantry in the house and the garden.  They opened fire on 2nd and 3rd squad who were advancing across the fields.  The rifle teams took shock, but the BAR teams are gunned down.  US force morale is slowly being picked away, and the German squads move back out of line of sight.  

In the face of German fire, 2nd squad fired covering fire at the garden and the Shermans fire HE rounds into the building with no real effect (I was hoping to knock down the building or make it unstable enough to force the German infantry out.)  3rd squad moved up on the far left flank and 1st squad, urged on by 2LT Acland, made it to the hedge, then moved towards the walled garden on the left. 


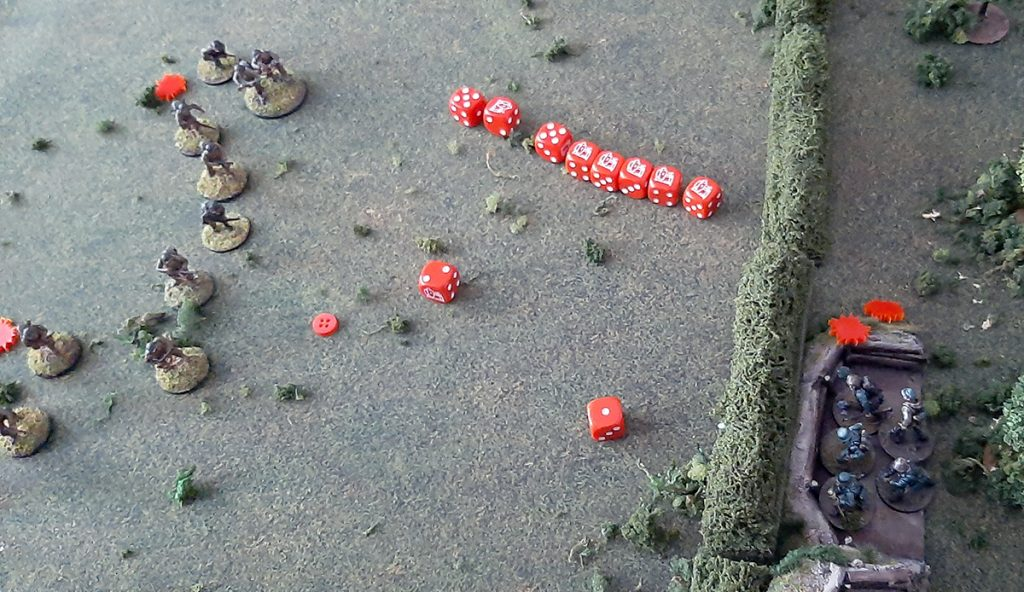
Getting into  sustained firefight with German Machine guns is a recipe for disaster, so SGT Waupoose orders his squad forward in a charge in a vain effort to clear the garden of Germans.  One lucky US soldier guns down the German squad leader but ultimately the US force is wiped out.  US force morale drops further!  


The Germans continue to fire sporadically at 2nd squad, wounding SGT Carney and inflicting more shock.  2LT Acland and first squad move closer to the walled garden to line up for a follow up assault on the squad in the garden.  A shell from one of the Sherman's blasts into the garden, causing some shock and throwing dirt all over unterfeldwebel Zausel who has rushed forward to take command of the squad.  As first squad closes on the walled garden a third German squad pops up and fires at them, again causing shock on the rifle team and killing all but one of the BAR team, who breaks and runs for the rear.  

With the end of the turn, 2LT Acland decides war isn't all it is cracked up to be and withdraws.


US Force Morale:1

German Force Morale:8

So....another defeat for the US!  reviewing the game afterwards, clearly advancing on the right flank across open ground was not the best tactical move.  The left flank provided more cover for the infantry.  Unlike previous games I used overwatch and covering fire more, with some effect and did better with fire and maneuver.  The charge by third squad was a bit of a gamble which ultimately didn't pay off, but then getting into a firefight with Germans to kept moving forward, firing at half effect, and withdrawing, was not going to go anywhere either.  And on the plus side, I did take out one of the German junior leaders who won't easily be replaced.   

Post-game events.

The US took 22 casualties in this game, including the loss of SGT Waupoose. As before, US casualties don't need to be tracked but 10 are killed, 6 seriously wounded and 5 lightly wounded and will be available for the next game (not that it matters as I get a fresh platoon each time).  The Surviving BAR gunner from 1st squad and one of the survivors from 3rd squad are listed as MIA...They eventually roll back into the company Command Post later. two of the wounded survivors from 3rd squad are captured and sent to the rear.


Roll of Honor

SGT Waupoose KIA, 175th Infantry

CPL McWilliams KIA, 175th Infantry

LCPL Sheridan KIA, 175th Infantry

LCPL  Yates KIA, 175th Infantry 

PVT Chapin KIA, 175th Infantry

PVT Ely KIA, 175th Infantry

PVT Serpico KIA, 175th Infantry

PVT Poulos KIA, 175th Infantry

PVT Hervey KIA, 175th Infantry

PVT Torres KIA, 175th Infantry

PVT Wheatley KIA, 175th Infantry.

2LT Peterson, KIA, 747th Armored

CPL Mercado, KIA 747th Armored

PVT Karic KIA 747th Armored.


PVT Markland POW, 175th Infantry

PVT Kostnaro POW 175th Infantry.


Col. "Pops" Goode, is getting shakier and shakier and drops down from Nervous to Anxious.  However, I elect to have the divisional commander give him a stern talking to to focus his mind.  As a result he ends up back at Nervous.


And on the German side, poor Obergefreiter Ralf "Fuchs" Lohse is killed outright.  One of the soldiers in the squad is promoted to squad leader


 So, a nice little game.  The US advance continues to get bogged down while the Germans manage to move more troops and equipment across the bridge to safety.  Next, 1st Platoon will try and take Arthenay in order to get the 29th Division moving.


                                     The battered survivors of 2nd Platoon head back to the Company Command Post.


Thursday 14 July 2022

29 Let's Go! The Probe at La Cambe (Turn4) Map 1

 Back to La Cambe!

B Company's woes continue.  The three platoons of the Company have each had an attempt to take the hamlet of La Cambe and each time they have been rebuffed. Casualties have been high, but it is time for the company to make one last attempt.  It its getting close to late morning and La Cambe should have fallen hours ago.

Elsewhere the 175th Regiment are not having a good time of it.  Colonel Goode has been shaken by the resistance of the German army and has become a little shaky.  So much so, in fact that he has started to dig in, worried that a counter attack will drive him back to the sea.

At the end of the last game Colonel Goode's outlook had dropped to nervous


Time to get Brig. Cota on the scene!

"What the goddam hell is happening here Colonel?!" The handful of men in the temporary command post jumped to attention as Brigadier Cota stormed in.  Colonel Goode blinked once or twice in surprise.

"General! We...er...we're facing stiff resistance on the advance. It looks like the enemy are fighting back.  My lead company have taken casualties and also are reporting 88mm flak fire.  I've sent a company from 2nd Battalion to silence them and am beginning to dig in here, sir.  We need to get more support before we can push forward."

"No, no, no.  Goddam it Colonel.  No waiting.  We need to link the beachheads up immediately!  Get your force moving and take La Cambe.  No digging in.  Movement, what is needed!  Action!  Not siting about on our asses! Get it done Colonel!  Fire the goddam company commander if he can't do his job!"

Colonel Goode blinked again. was the Brigadier mad?  The invasion was going badly and he was sure a massive German counter attack was coming. 

"Don't stand there blinking at me man!" Brigadier Cota shouted. "Get moving!"  

After the Brigadier's tirade, Colonel Goode stiffens his resolve, and his outlook moves up by one.  He is now worried.


Meanwhile further up the road, the men of B Company get the order to attack again....

Captain Whyte handed the radio receiver back to his RTO. Colonel Goode had just ordered another attack.  He looked around at his two surviving platoon commanders. 

"Let me take a platoon forward." LT Derrick the B Company XO asked.  "If you leave it to Hendry, you'll get another platoon chewed up, and Morrison still seems too shaken to be any use.  Captain Whyte thought for a moment, then nodded. "Sure.  Take 6 Platoon - they're mostly intact.  Make up the numbers from volunteers and the company HQ. Get it done Derrick.

So, the Company XO takes 6th Platoon forward.  Derrick was a pre-war solider promoted from the ranks.  The Platoon sergeant remains - S/SGT Kentner.  Two of the Squad leaders are also combat ready - SGT Dean in charge of 1st Squad, and the older SGT "Pops" Herbert in charge of 3rd squad.  2nd Squad was commanded by SGT Connor who took a round to the leg in the first game and has spent the past few games hiding in a ditch by the road.  He has finally crawled back to the company to be patched up by the medics.  His spot as 2nd squad commander has been taken by SGT Ericson from the Company HQ section.


This time I have more support than I know what to do with.  But as mentioned in previous games sometimes having too much support can be a problem as you don't have the command dice to activate everyone.   Anyway, for this game I take 3 shermans, a 50 cal., a 30. cal, a flame thrower and the forward artillery observer. I also give extra BARs to the squads.  

In planning terms I am going to use the FOO to blast a way through any German resistance and try and move a jump off point forward where I can to cut down the amount of ground I have to cover.  I don't generally like using the artillery barrage, but needs must!  So, onto the game!


The Patrol Phase ended up slightly different than before.  I messed up the initial moves and so lost out on my usual base in the house on the right flank.  After some thought Sigur managed to get a jump off point there.  Clearly while B Company were sorting themselves out, the Germans decided to check out the building and take it over.  I did manage to get a jump off point behind the burnt out wreck of the tank that was knocked out in the first game and which has sat blocking the road ever since. 


Unfortunately for me, US force morale was low at 9 points.  Clearly the beating B Company had taken didn't make the men particularly keen to fight again.  By comparison, the Germans, pleased with holding off the entire US army, are at a comfortable 11.  It's going to be tough. Again.

As before the US forces begin their advance.  Given the disasters that have befallen them on the right flank  they decide to focus on the centre and left for this attempt. 


  A squad under SGT Dean and with LT Derrick move up behind the burnt out tank, with a Sherman in support.  There appears to be a lack of Germans so the advance continues.  The squad under SGT Dean rushes towards the farmhouse on the right flank.  They don't fancy a squad of Germans popping up there and firing into the flank.  On the left flank the squad under SGT Ericson appears.  everything looks quite so Ericson orders two men forward to scout out the ground.  More tanks arrive in support.  Everything seems to be going to plan, LT Derrick thinks.


 SGT Dean's squad captures the German jump off point in the building, and the Germans take a hit to their force morale.  


The US advance continues.  The scout team rushes forward....


...while American firepower builds with the arrival of the 50. cal and the FOO.


With a nice base of fire established and the right flank secured, the scouts move further foward...


.... and ultimately bring out the Germans who open fire. But their fire is pretty desultory and only gun down one of the scouts


The remaining scout, who can't believe his luck, hits the deck only to be shot shortly after.


The German forces have now revealed their firing positions 


and the US armored might moves forward. 


The Germans deploy their PAK40 to try and hold of the tank advance.  But the rounds do little damage other than shock the crew, although the gunner is also killed.  With a nice group of Germans in sight, LT Pryor the FOO, orders up some artillery.  Not bothering with a ranging shot he orders "Fire for effect!"

Mortar rounds plaster the ground in front of the barn then the battery adjusts fire until the strike hits the barn itself.  German troops out in the open scarper for cover.


A combat cameraman from the 175th regiment takes a photo just as the mortar barrage lands, while the 30.cal MG sets up on the right flank.


But my poor artillery luck strikes again and the turn ends, along with my barrage.  I do have a piece of luck though in that the Jump off point in the farmhouse isn't recaptured by the Germans in time, so Sigur is down to two Jump off points. 


 I think about keeping the barrage going but both Sigur and I have enough chain of command points to negate each others actions and, ultimately, he has one more than me so, the barrage remains regardless.  That is somewhat annoying as I could have done with barrage going on for longer. 

While the tank on the US left flank is still taking hits from the PAK40 as the commander tires to switch out the gunner, his companion tank decides to rush up the road in an effort to gain ground.  The PAK 40 switches his aim to this new threat but misses to start with - a blast from the off-table 88mm guns also misses.  The tank commander thinks he's going to make it, when a lucky hit from the PAK40 takes it out, killing the entire crew.  The burning wreck rumbles off the road and into a drainage ditch.

However, the US forces are now emboldened.  I use a chain of command point to move my jump off point forward behind the remains of the tank and deploy a squad let by SGT "Pops" Herbert.  On the US right flank the squad that captured the jump off point in the farmhouse moves forward, as does the one on the left flank. 


As the two squads meet in the road, another squad of Germans appear. 


Having no more chain of command points, I can't bring in another barrage unfortunately - Sigur would just end it, but hopefully this quantity of troops will get the job done regardless. 

On the US left flank, the PAK 40 finally takes out the tank, causing the crew to bail out.  The PAK 40 crew has slowly been whittled down though by tank fire and the supporting 50.cal.  


On the right flank, the 30.Cal opens fire on the Germans in the orchard with little effect.  But this could be it though.  With Dean's squad acting as a firebase, SGT "Pops" Herbert orders his squad to rush forwards.


The Germans are getting worried now.  The remains of the squad in the barn, despite their shell shock, rush around the building, supported by colleagues in the upstairs of the barn.


The Germans in the bunker in the orchard also see the threat and crawl slowly from their trenches, 30. Cal rounds occasionally whistling past their heads. 


Urging his troops on SGT Herbert, can see the end in sight....


But then as so often, things go horribly wrong.  This gets complicated so I'll have to steal Sigur's detailed overview.


SGT Herbert's squad rushes up the road, taking casualties and just falls short, by a couple of inches.  As the German squad vacates its position in the orchard SGT Dean's squad rushes forwards to occupy the entrenchments...or would do if they can get over the hedge!

On the US left flank, the squad under SGT Ericson storms the PAK40 emplacement killing the remaining crew and junior leader.  In turn Ericson's squad is gunned down by the Germans in the barn with SGT Ericson being wounded.


With SGT Herbert's squad on the road stalled by gunfire from both the left and the right, SGT Dean's squad on the right flank assaults into the orchards, checking the entrenchments for any Germans.  Not seeing any, one team of Dean's squad pushes further right through the trees in an attempt to get off the table from that side. 


The weight of fire is too much for Herbert's squad, who break and run. Herbert himself lies wounded as his men flee.  With the threat from the US left flank and centre neutralized, the German squad pulls back into the the orchard, shooting as they go.  This causes sufficient casualties for US force morale to collapse and the survivors retreat once more....

The battlefield at the end of the game


 ----

Gah!  So close, and yet so far!  This was another really tense and exciting game, and I came so close to victory.  Taking out the German jump off point in the farmhouse and moving my own jump off point forward really worked well.  That allowed me to have a nice force of US troops halfway up the table, which were a real threat.  But the dice ultimately went against me.  Towards the end when the fighting was at its hardest and my squads were reduced to teams, I never rolled any ones which would have allowed teams to move rather than squads. As such the two teams of Herbert's squad were pinned in place and whittled down.  The other two squads ended up taking a lot of punishment as well.  

My plan to use the barrage was good but as in previous games the barrage just didn't last long enough.  The concept was right it just wasn't executed well.  I could have ended up in a pointless battle of chain of command dice to keep it going, but ultimately wouldn't have beaten Sigur.  Once I used my last chain of command point to move my Jump off point forward behind the tank, I didn't get any more for the rest of the game which made the final push just that bit harder. 

As always Sigur played a blinder of a game, focusing firepower where it was needed.  The early loss of one of his jump off points was annoying but not fatal.  He did lose his PAK40 however, and I get the sense that this time round he was under a lot more pressure.  But ultimately he prevailed and the US are defeated again.

Although 6 Platoon survived the first game relatively unscathed, they took 26 casualties this time round.  13 are killed outright along with one of the engineers and the crew of one of the Sherman tanks. 7 more are too wounded to fight and the remaining 6 crawl back to the US lines to be patched up. 

175th Roll of Honor

CPL Ardle 175th Infantry KIA
LCPL Ryben 175th Infantry KIA
PVT Anderson 175th Infantry KIA
PVT De Souza 175th Infantry KIA
PVT Drake 175th Infantry KIA
PVT Freedman 175th Infantry KIA
PVT O'Reilly 175th Infantry KIA
PVT Hennemann -175th Infantry KIA
PVT Bacher 175th Infantry KIA
PVT McKay 175th Infantry KIA
PVT Williams 175th Infantry KIA
PVT Tennent 175th Infantry KIA
PVT Clutter 175th Infantry KIA

SSGT Wilmot 747th Tank Battalion KIA
CPL Jovic 747th Tank Battalion KIA
PVT Daniels 747th Tank Battalion KIA
PVT Underwood 747th Tank Battalion KIA
PVT Queen 747th Tank Battalion KIA
PVT Trepp 747th Tank Battalion KIA

PVT Gasgoine 29th Engineer Battalion KIA

SGT "Pops" Herbert is captured.  But fortunately for him, the German guards think the old man is no trouble and don't keep an eye on him, so he escapes and makes his way back to the US lines.  He picks up the soldiers medal for his efforts.  SSGT Krychek and SGT Waterman who were captured last game are no so lucky.  LT Gruber and his little tank hand the two men over to the German Feldpolizie and they are on their way to a prison camp in Silesia to sit out the war.  

This is all too much for Colonel Goode.  Despite the chewing out by Brig Cota, he loses his nerve once more and his outlook falls to nervous.


I elect not to have the divisional commander act so we agree that there will be a 1 turn pause which will allow Sigur to strengthen his defences (as if I need that!).  B Company is no longer effective as a fighting unit. Of the roughly 132 combat effective men in the company, 44 have been killed and another half on top of that are too seriously wounded to keep fighting, reducing the company to around 1 and a half platoons.  Of  the senior and junior leaders, Sergeants Deveraux, Corossi, Roth and Croft are killed, and Sergeant Connor and LT Jameson are too wounded to continue to fight.  SSGT Krychek and SGT Waterman are captured. The remains of B Company are ordered out of the line and are relieved in place by A Company who will now try to take La Cambe.  To add insult to injury, Captain Whyte of B Company is relieved of command and spends the rest of the war in England in charge of a garrison service company, flying a desk and dealing with shit.

Captain Whyte once again handed the handset back to his RTO.  
"Everything OK?" 2nd LT Morrisson asked. 
"I've been relieved of command!" Whyte said morosely. "A Company is moving up to take over from us.  We are to head back to the regimental HQ and await further orders.  Form the men up Lieutenant and take them back.  I'll wait here for Captain Ford and give him an overview of the situation....

.... Private Dewey of A Company ambled up the road, point man for the whole company, a cigarette dangling from his mouth.  A Company had been sitting around all morning waiting for something to happen.  There had been a lot of gunfire and explosions up ahead, but no-one really knew what was going on.  Now the order had come down from Colonel Goode to hustle up the road, and so the company had picked up its gear and moved.  Behind him he could hear the men of 1 Platoon talking and joking.  Suddenly he could hear the sound of marching.  Round a corner marched a group of men... although marching was perhaps too strong a word for the shambling mass.  The men were bloody, dust covered, missing weapons, helmets and equipment.  A nervous looking LT was leading the column.
"Damn." Private Dewey whistled, the cigarette falling from his mouth. "You look like you've seen some action." Behind him Dewey heard the rest of 1 platoon fall silent as the battle-weary B Company moved past.  He stopped the LT.
"What's the story, sir?" Dewey asked.
The LT paused for a moment. "I hope you've got your wits about you, private." LT Morrisson replied.  We took a pounding.  The Germans just chewed up our Company.  Good luck up there.  You'll need it."
Dewey looked on in amazement.  "Are the rest of B Company as badly beat up as you guys?" he asked incredulously.
The LT looked at him blankly for a moment, then to the filthy men marching past him. "No private, this is the rest of B Company.  He clapped the private on the shoulder and moved off with his men.
"Damn"  Dewey whistled again. 

Thursday 2 June 2022

29 Let's Go! The Probe at La Cambe (Part 3) Turn 3 Map 1

 Back to La Cambe!

The first two turns of the campaign have been a bit of a disaster for B Company of the 175th Regiment.  In the first game, 6th Platoon ran into some initial German resistance, fired a few shots and pulled back.  In the second game, 5th Platoon moved forward to clear the German positions, only to find that the Germans were dug in more than expected.  This time the Americans took heavier losses and had to withdraw, even though they got much closer to victory the first time round.

The shocked survivors of 5th Platoon take a rest and wonder how many more of them are going to get killed by the Platoon commander! 

The Regimental Commander, already a bit shaky, is getting even more concerned about a German counter-attack pushing him back into the sea and is thinking about digging in, which would hold up the American advance and prevent the linking of the beaches at Omaha and Utah. 

Captain Whyte, Commander of B Company orders 2LT Hendry to collect some of the wounded under a temporary truce while ordering 4th Platoon to get ready to push forward. 

The men of 4th Platoon

As before, it is not necessary to come up with the details of the US platoon for this campaign, but I like doing it, so here they are:

The platoon is commanded by 1LT Jameson, 29, from Georgia.  He is an average sort, and a bit old for a LT as he was promoted from the ranks following the attack on Pearl Harbor.  

He is assisted in the running of the platoon by SSGT Krychek, 27, a former travelling salesman from west Virginia.  He is short and full of fight.

1st Squad is led by SGT Croft, 25 a stockcar driver from Oklahoma who, surprisingly has put on a lot of weight since joining the army.  Probably because he enjoys too many beers in the local English pubs.

2nd Squad is led by SGT Roth, a teamster from Utah, also aged 25.  He is completely average in height, weight and looks.

3rd Squad is led by a spritely 22 year-old, SGT Waterman, a farmer from Arizona.  Bored of a potential life on the farm for ever, he joined up at age 19.  As with Roth, there is nothing particularly distinguishing about him. 

The game.

As before, there is little changed about the map (Sigur spread a lot of extra vegetation around to break up the straight lines which was nice). 


After the patrol phase, I ended up with a jump off point behind the farmhouse on the right flank as usual, one in one of the buildings overlooking the ploughed field and one behind the hedge in front of that house.  Sigur again got a jump off point in the hedge in front of the orchard, one in the hedge in front of the barn and one further back by a hedge along the road.  

As before, the yellow triangle on the table represents where the worst casualties took place last game - LT Hendry wasn't lucky enough to collect the dead and wounded so close to the entrenched Germans.  Any team moving within 4 inches of this pile of dead and wounded takes a point of shock.  Also, as in the last game, the tank that was knocked out in game one remains on the board blocking line of sight but fortunately has stopped smoking.  

I had even more support than before, which I spent on extra BARs for everyone, a 50 cal HMG, 3 tanks, a flamethrower and a forward artillery observer.  I am not a big fan of these as I think at times they can dominate the game, but by jove I need all the help I can get.  If this amount of firepower isn't enough to blast my way through, well I don't know what is.  

Despite the losses the US are keen to push on.  US force Morale is 11, while the Germans seeing endless waves of Americans get a force morale of 9.

With that, the game is ready to go.  

-----

If you want a job doing well, leave it to the professionals! 1LT Jameson thought to himself. He had seen the work of the "volunteer" officers and while he was grudgingly impressed - at least with LT Hendry - he felt he could do better.  The military taught him never reinforce failure and having seen two attacks cover the same ground with no success, he felt that it was time to try a new tack. After a brief discussion with his squad leaders and the officers from the artillery he decided that maybe the left flank would be a better approach.  But first he'd try and expose the entrenched Germans and blast them with fire to reduce the strong point.

With that in mind 1LT Jameson orders the 50 cal. back into its position in the roof of the house on the left flank, which is then supported by the Forward Observers.  Although not planning to reinforce failure, LT Jameson sends a squad forward on the right flank to hopefully draw the Germans out of cover. 

                                                             A squad pushes forward...


..                                               ...as the heavy firepower gets into position.


As before, a new tank from the 747th tank battalion rolls forward along the road, while LT Jameson leads a squad forward on the left flank.  He thinks this is a better opportunity for an assault.  


In line with the plan, the US squad on the right flank moves closer towards the entrenched Germans in the hedgeline.  As they approach they head the calls of their wounded alerting them to the German position.  A sputtering of fire from the entrenched Germans in the hedge doesn't cause the Americans much concern.  Their return fire is more devastating. 


With a clear line of sight, the 50 Cal also opens up on the German strongpoint and the combined fire causes almost 50% casualties on the German squad hiding inside.  

As the US troops on the right start to pin down the Germans in the strong point, the main advance starts on the left.  The rest of the tank troop moves up, avoiding the road where their colleagues were destroyed, instead heading towards the ploughed field, while LT Jameson and his squad wait for the tanks to come up so they can advance with armoured support behind them.


LT Jameson orders his squad forward

Although the LT's plan was not to reinforce failure on the right, SSGT Krychek has other ideas.  He moves forward bringing third squad in on the right.  The SSGT seeing that there isn't much fire coming from the German strong point and knowing that the  50. Cal is providing support, sees an opportunity for glory.   


LT Jameson looked over to his right and saw SSGT Krycheck moving forward with the platoon's reserve squad in tow.  "What the heck!" he muttered.  "That's not part of the goddam plan!"  But he had to admit there didn't seem to be much return fire coming from the german strong point so...maybe it would work...maybe....

The entrenched Germans in the hedge start getting their act together and fire into the lead squad.  They take casualties and the remaining BAR gunner drops his weapons and heads to the rear, ignoring SSGT Krychek's orders. 

Sigur actually is playing a very clever strategy with the germans in the strong point.  Hoping for double phases, he moves troops into and out of the entrenchment firing at half effect each time.  Its just enough to whittle away at my advancing troops while protecting his from the worst of the return fire.  This time however, the strategy goes tits up. 

This is the second time we have a 4x 4, 1 x 5 roll in this campaign - the first being on my first turn of the first game.  I think this is probably the worst roll you can get especially for the Germans.

The advancing US troops on the right sense that the German fire is slacking and push forwards to close the gap and clear out the entrenchment.  An enterprising GI lobs a smoke grenade forward to cloud the German position and help the US forces move up.  Meanwhile next to the 50 Cal in the house over on the US left flank, the FOO sees the smoke and thinks its a marker for fire. 

"This is LT Pryor, requesting heavy mortar support!" The FOO barks into the handset, ears ringing from the sound of the 50. Cal firing.  "Fire one round, ranging shot, at the following co-ordinates!"
On the other end of the phone the Mortar battery officer acknowledges the request and within moments a single round falls just short of the hedge.

Boom!   


Everyone hits the deck expecting the full wrath of the mortar battery to come down on the German position.  The US infantry mutter quiet prayers, knowing that if they are unlucky they will get caught in their own bombardment.  But...nothing.  Its strangely quiet.  So quiet in fact that birdsong can be heard over the battlefield.  Cautiously the US troops stick their heads up to see what is going on. 

In a stroke of bad luck for the US, the turn ends  The mortar barrage is halted, requiring reconnection and the smoke in front of the exposed squad drifts away.  Things are not looking good on the right flank...again!

Goddam it! LT Pryor cursed as he peered out of the window of the house.  The ranging shot had landed bang on target but before he could order "Fire for effect!" the connection was lost.  After a few moments of  static, the Mortar officer comes back on the line.  "Fire for effect!" Pryor yells. "That's a negative!" Comes the reply.  We are getting calls for mortar support from all over.  Wait out." Banging his Radio receiver against the wall in frustration, Pryor curses the world in general. 

On the left flank, LT Jameson leads his squad forward.  He heard the first mortar round land but then nothing.  He puts it to one side as he is distracted by the rumble of a tank passing by his position and heading towards the German line.  If he can get his troops forward with the tank support, Jameson thinks he can push past whatever resistance is there.    


 But then, there is another boom, this time from up ahead of Jameson.  An anti tank gun fires and hits the lead tank.  Jameson is confused - he thought Hendry said that the anti tank gun was in the hedge? But despite a couple of shots hitting the machine, it doesn't seem to have much effect and the tank lumbers forward.  Jameson orders his squad to fire into the gun position as well and he can see a number of gunners fall to the ground.  In return, a German squad rushes out of the cellar of the barn and opens fire on Jameson and his squad.  A round catches LT Jameson in the throat, missing anything vital but causing him to fall to the ground.  

As LT Jameson falls wounded, the two squads in front of the German entrenchment take a significant amount of fire.  It takes all of SSGT Krychek's efforts to keep the men in action.  But this is unsustainable.  If they don't move they will end up like their comrades in the other platoons.  SSGT Krychek pushes the remains of one squad forward towards the road and away from the German guns in the entrenchment. Led by SGT Waterman, the small group hope to break through the German lines       


With luck they can make a dash for it.  Unfortunately a small group of Germans spots the move and rushes through the orchard to head off the US squad.  


With LT Jameson bleeding out in the field and the tank engaged in a fruitless battle with the anti tank gun and the remainder of the squad in a firefight with the Germans, the attack on the US left flank is going nowhere.  On the right most of the advancing  US troops have fallen.  This could be the only chance for a US victory!

But no...The crafty Germans hurl grenades at the tiny US squad which has finally reached the road.  All the troopers are killed leaving only the SGT Waterman and SSGT Krycheck, neither of whom count for purposes of winning the game.  Not that this deters them. 


 SGT Waterman makes a dash for it, while SSGT Krychek simultaneously tried to administer aid to the fallen and provide covering fire.  But to no avail.  SGT Waterman is picked up by a passing officer in a little tank and SSGT Krychek is captured at gunpoint by the small German squad.  

                                       Lt Gruber and his little tank, intercepts SGT Waterman.

With the LT down, the SSGT captured and most of the squad leaders either dead or in German hands, once again US Force morale collapses and the men run to the rear.  

------

Well, that was another terrible game for the US.  Too be fair, this time I think I had everything in place, but the turn ending at a critical moment threw it for me.   I had a nice base of fire and was doing well against the strongpoint while other troops including armor moved up on the left.  For a moment it looked like the German strongpoint would be cleared - I had caused enough casualties, had a sufficiently strong force in place and was expecting a devastating Mortar battery strike.  But no... in the end the single mortar round wasn't followed up and the smokescreen drifted away in the wind.  Once LT Jameson went down and the German strongpoint continued to blaze away, it was pretty much all over.  Despite a very cinematic effort by SSGT Krycheck and SGT Waterman, ultimately it would have no effect beyond them ending up in the bag.

The US took another 28 casualties from the core platoon.  Plus SSGT Krychek and SGT Waterman were captured - I roll next turn to see how they fare.  LT Jameson, is too badly injured to continue to fight and SGT's Croft and Roth were both killed.  So 4th Platoon has lost all of its NCOs and officers. 13 of the platoon are killed, another 7 are too badly wounded to fight and 6 return to the company after being patched up.  This includes a Corporal Marlowe who finds himself in the unfortunate position of acting platoon commander for now.  

175th Roll of Honor Turn 3  

SGT Roth 175th Infantry - KIA
SGT Croft, 175th Infantry - KIA
Cpl Manning, 175th Infantry - KIA
LCPL Dean, 175th Infantry - KIA
Lcpl Guzman, 175th Infantry - KIA
PVT McManus, 175th Infantry- KIA
PVT Drew, 175TH Infantry - KIA
PVT Derwnt, 175th Infantry - KIA
PVT Carpenter, 175th Infantry - KIA
PVT McItyre, 175th Infantry - KIA
PVT Javez, 175th Infantry - KIA
PVT Pugh, 175th Infantry - KIA

SSGT Krychek - POW
SGT Waterman - POW

It's all getting a bit too much for LT Col. Goode whose outlook drops from worried to Anxious.  Time to get Brigadier Cota on the scene!


To read the AAR from the German perspective, see Sigur's Tabletop stories blog: https://www.tabletopstories.net/language/en/2022/05/29-lets-go-game-3/ 

--------

Captain Whyte looked on as yet more of his men streamed back to the command post.  He couldn't see anyone in charge.  In fact, it didn't look like anyone more senior than a Corporal was left in the platoon. This was not how it was supposed to be!  He felt another tug on his sleeve and his RTO handed him the phone. "Call for you, Sir!" The RTO said. "This time it is the colonel for you..."  Captain Whyte sighed again and began to wish he'd joined the Coastguard, like his brother in law....